I’m baaaack..

A few years back, I set lpaulriddle.com up on Ubuntu Linux running on a AWS EC2 instance. It ran just fine there, but to be honest, was kind of a mess. I was dreading the day when I would eventually have to update it or move it somewhere else, because I didn’t document anything that I did while configuring it, and thus, it would take forever to get everything working again.

Last summer, I decided to bite the bullet and redo everything on the site to run in Docker containers. That way, I’d have a repeatable build/deploy process that I could easily move around independently of the underlying support framework, be it ECS, another EC2 instance running Docker, or whatever. It’s still a work in progress, but it’s inching closer to completion. One of the first things I did was to move the MariaDB instance that hosts this blog’s database tables, into a container. This worked mostly OK: the blog still rendered just fine, and I could click around and read all of the posts the same as always. However, when I logged in at /wp-admin, It gave me a permission error, and I could not get to the dashboard. That effectively locked me out of the blog, preventing me from writing new posts, among other things.

About 4 months later, I finally got around to fixing it. Since I planned to move WordPress into a Docker container anyhow, I decided to start over with a fresh database, and just import all of my original blog content into the new instance. The catch was that I needed to somehow get into my old instance one last time to export the data. After some searching around, I found a snippet of PHP that I could add to my theme to bypass the permissions checks. That did the trick: I finally got back in, exported the data, and brought everything back up in a new, shiny Docker container. The blog is now powered by a Nginx front-end that talks to WordPress over a FPM proxy. Fun stuff.

Now that I can post again, I’ll try to write some more as the spirit moves me. As you can imagine, 2020 has been an interesting year with some pretty big changes to my daily routine.

Cloud

For a long time, I have been running an Ubuntu desktop in my basement “office”. However, lately, I’ve been using it less and less, in favor of my laptop. It runs a local web server which hosts a private wiki that we use for household stuff (recipes, scanned documents, etc); it also has two monitors, which occasionally comes in handy when I’m doing something that requires a lot of screen real estate. And, it runs Gnucash, my financial software of choice. But for the most part, it functions as a print and file server, and that’s about it.

A couple of months ago, I had an epiphany. It occurred to me that I don’t need this PC in the basement. I might use it one or two days a month, but for the most part, it sits there sucking up power. So, I came up with a plan:

  • Get a DVI adapter cable for my laptop so I can run it with an external monitor, which should solve my screen real estate issue.
  • Spin up an AWS EC2 t2.nano instance to run the wiki, and possibly, Gnucash.
  • Retire the PC, and get a Raspberry Pi or similar device to take over as print server and file server.

So far, I’ve got the AWS instance up and running, and moving the wiki over to it was surprisingly easy. I have to worry a little bit more about security now, as the AWS instance is available from anywhere on the Internet. My old web server was only accessible over our home LAN.

This AWS instance is the first “personal” web server I’ve ever had. Previously, I used public web space on a server hosted by my employer (a University). But, I’m trying to migrate things away from there, in an effort to separate my “work” and “personal” online identities. To that end, I’m also using the new AWS instance to host all of the content that was previously on the University’s server.

Lastly, I used to host this blog at wordpress.com, but now that I’ve got my own server, I figured there was no reason not to host my own WordPress instance. So, I moved the blog over as well.

I have to give a shout-out to Let’s Encrypt, a free online Certificate Authority. Before they came around, I would have had to shell out big bucks for a SSL certificate.

I thought Gnucash was going to be a sticking point. It’s not really a cloud-friendly app. I didn’t really want to install a full X-Windows environment on a t2.nano instance, just to have somewhere to run Gnucash. That seemed like killing a fly with a sledgehammer. Initially, I tried running it on the Mac via X11 forwarding. I set up XQuartz on the Mac, installed gnucash on the t2.nano, and tried it out. I was not happy with the performance at all. I ended up running the Mac-native version of Gnucash, and storing the data file on Dropbox. That seems to work OK, and gives me a centralized repository for the data file, while allowing me to run Gnucash on multiple Mac desktops (providing I remember to exit when I’m finished with it — it does not deal well with multiple instances accessing the data file simultaneously).

Speaking of Dropbox, I’ve just started using that as well. Although there are a couple of annoying things about it, I think it’s going to work well for me. It fits in well with how I like to work (read: it works well with the shell) and also supports Linux natively, which was a must-have for me. I’ll likely write something up about Dropbox once I’ve used it for a little longer.

For now, I still have the PC sitting in the basement. I still have to buy a Raspberry Pi, install Linux on it, and set it up as a print server. It’ll also run a 3TB USB disk that I’ll use as an offline backup for my Dropbox files, as well as VMs, and other assorted things that are too large for Dropbox. Stay tuned!!

Enumerating Contract Bridge Auctions with Lisp

I’ve been a fan of Contract Bridge for a long time.  I’m really bad at it, but all the same, I find it fascinating and compelling.  One of the interesting facts about Bridge is the astronomical number of possible auctions.  For any given deal, there are over 128 × 1045 possible auctions. The exact number is:

128,745,650,347,030,683,120,231,926,111,609,371,363,122,697,557

That’s a lot!  Being the nerd that I am, I decided to dust off my LISP skills (mostly neglected since college) and write a program to enumerate them.  To wit:

(setf allbids
      '("1C" "1D" "1H" "1S" "1NT"
        "2C" "2D" "2H" "2S" "2NT"
        "3C" "3D" "3H" "3S" "3NT"
        "4C" "4D" "4H" "4S" "4NT"
        "5C" "5D" "5H" "5S" "5NT"
        "6C" "6D" "6H" "6S" "6NT"
        "7C" "7D" "7H" "7S" "7NT"))

(defun printMore (bidList bidStr)
  (if (null bidList) nil
    (progn
      (mapcar #'(lambda (p)
                  (printAuctions bidList (concatenate 'string bidStr p (car bidList))))
              '(" " " P " " P P "))
      (printMore (cdr bidList) bidStr))))

(defun printAuctions (bidList bidStr)
  (let* ((matrix
          '(nil
            " P P Dbl"
            " P P Dbl Rdbl"
            " P P Dbl P P Rdbl"
            " Dbl"
            " Dbl Rdbl"
            " Dbl P P Rdbl"))
         (bidMatrix (mapcar #'(lambda (x)
                                (concatenate 'string bidStr x)) matrix)))
    (dolist (x bidMatrix)
      (progn
        (print (concatenate 'string x " P P P")
               (printMore (cdr bidList) x))))))

(defun printSomeAuctions (startBid &optional (prefix nil))
  (let ((bidPos (position startBid allbids :test #'equal)))
    (if bidPos
        (let ((bidList (nthcdr bidPos allbids)))
          (printAuctions bidList (concatenate 'string prefix (car bidList)))))))

(defun printAllAuctions ()
  (progn
    (print "P P P P")
    (mapcar #'(lambda (p)
                (printSomeAuctions "1C" p))
            '(nil "P " "P P " "P P P "))))

(printAllAuctions) will iterate through and print out every possible Bridge auction.  Don’t hold your breath waiting for it to finish, though.  The computer I was using, a Linux box running CLISP, printed out around 14,000 auctions per second.  At that rate, it will take 291.4 × 1033 years to complete.  That’s over 21 septillion (21 × 1024) times the age of the known universe.

ZyXEL WAP3205 – Not Recommended

Last Fall, I got it into my head that I needed to upgrade my home network’s wireless access point (WAP).  I’d been using an old, but trustworthy, Netgear WG602V2 since around 2001-2002, and while it worked, I was hoping to get something with a bit more range, that supported 802.11N and various newer features.  I decided to try out the ZyXEL WAP3205.

The ZyXEL started out OK, although it did not seem like much of an upgrade over the Netgear.  The range and data throughput weren’t noticeably better.  The problems started after a few months, when I upgraded my Macbook Pro to Mountain Lion.  When I woke my laptop from sleep mode, the wi-fi would no longer automatically re-connect.  I had to manually re-join the network every time.  A pain, but not a show stopper.

The next problem started when I began playing around with AirPlay/AirPrint, both of which use Apple’s Bonjour service, which uses multicasting.  With the ZyXEL, Bonjour was flaky at best: sometimes it worked, sometimes it didn’t.  I couldn’t figure out any rhyme or reason to it, other than that the WAP was definitely the culprit, as Bonjour services worked fine over wired connections.

I read on a web site somewhere that the latest firmware on the WAP3205 addressed some issues with Bonjour.  I was skeptical, because the firmware release notes didn’t mention anything about Bonjour, but I went ahead and updated anyway.  This turned out to be a disaster.  Not only did the new firmware not fix the Bonjour issues, it also messed up the networking on the WAP somehow.  After upgrading, the wired ethernet interface on the WAP started randomly freezing up.  The wireless was still active, but the WAP stopped responding to pings.  This happened a couple of times.  Another time, the interface stayed up for several hours, then froze up my entire LAN.  None of my wired devices could connect to anything else on the LAN.  When I unplugged the WAP3205, LAN connectivity instantly came back.  Word of warning to WAP3025 owners: don’t install firmware version 1.00(BFR.7)C0 (released November 2012).  This is the version that caused the instability with the LAN interface.  I’d recommend waiting until a newer firmware revision is released before updating.  Caveat Emptor.

After the LAN freeze-up, I ditched the WAP3205 and went back to my old Netgear.  With the Netgear, Bonjour works great, I’m able to use AirPlay/AirPrint without any issues, and when my laptop wakes from sleep, the wi-fi reconnects without any problems.  The Netgear isn’t perfect, though.  I’m not able to get AirPlay mirroring working.  The mirroring starts up and works for a few seconds, but then it shuts itself off.  I had the same issue with the ZyXEL, so I’m not sure if the WAP is to blame for this or not.  Searching the net hasn’t turned up a good explanation for this behavior so far, but I’m going to keep looking for a fix.

In short: If you need a reliable wi-fi access point that works with Bonjour, stay away from the ZyXEL WAP3205!

Another GIMP Trick

Recently, I had occasion to convert a few shapes extracted from a flash movie to PNG format.  I used the excellent swftools suite to extract the shapes from the movie, and then I used  Gnash to render the shapes and save PNG format screen shots. This works great, but unfortunately, the resulting image is missing the alpha channel, and its background is white.  I wanted a way to restore the shape’s transparent background.

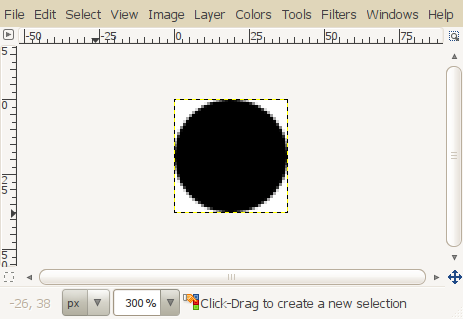
One easy way to restore transparency is to use GIMP to select all the white background pixels and “erase” them to make them transparent.  Unfortunately, that’s not quite good enough.  That’s because anti-aliased images have “semi-transparent” pixels around the edges, which show the white background underneath.  If you just erase the white pixels, the semi-transparent pixels will leave artifacts around the image:

The above image is on a black background to highlight.  Note the white artifacts around the edge of the circle.

To truly restore transparency and get rid of the artifacts, we need two images, one on a white background, and another on a black background.  Then we can compare the images and average out the differences between the semi-transparent areas, thereby eliminating the artifacts.  For flash shapes, it’s relatively easy to generate a container movie that displays the shape on a black background.  You can do it with the “swfc” utility provided with swftools, and a script like this:

.flash filename="blackbg.swf" bbox=autocrop
   .swf temp "shape.swf"
   .put foo=temp
.end

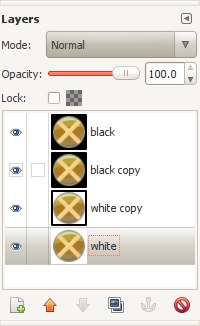
Load the two images into GIMP using the “Open as Layers” dialog from the File menu.  Then duplicate each layer so that you have two copies of each image.  Order the layers so that the 2 layers with black backgrounds are on top of the white layers:

For clarity, I’ve renamed the layers according to their background colors.  Next, you want to hide “black” and “white” and select “black copy”.  Then set the opacity of “black copy” to 50.  The resulting image should be on a gray background, representing the average between black and white:

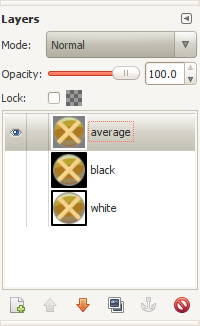
Now, merge the visible layers together (right-click on “black copy” and select “merge down”) to create a single layer containing the averaged background.  Move this layer to the top:

Now, we want to find the differences between the black and white layers and use this to create a layer mask, which we’ll paste over the averaged layer.  Hide “average” and show “black” and “white”.  Select “black”, click on the “Mode” drop-down box, and select “Difference.”  The result should look something like this:

The amount of white corresponds to how much the two images differ.  The gray areas correspond to the anti-aliased pixels along the edge of the circle.

Now we’ll use this image to apply transparency to the top, averaged layer.  Press Ctrl-A to select the image, then Edit – Copy Visible (or Shift-Ctrl-C).  It’s important to “Copy Visible” and not just “Copy”, so we get the visual representation of the differences between the two layers.  Otherwise it’ll only copy the active layer.

Hide the two bottom layers, so only the top “average” layer is visible.  On the Layers dialog, right-click the top layer and select “Add Layer Mask.”  Select the first option to initialize the mask to white (full opacity), and click “Add.”

Make sure the top layer is selected.  Right-click on it in the layers dialog again and ensure that “Edit Layer Mask” is checked.  Then, paste the clipboard into the layer mask with Ctrl-V or Edit – Paste.  Finally, invert the layer mask with Colors – Invert.

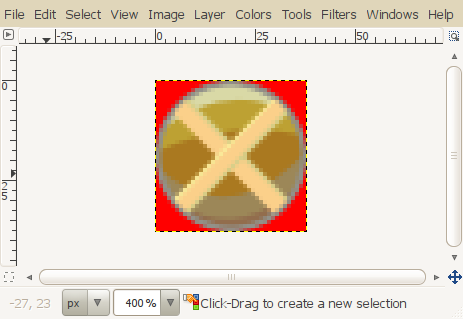
Here’s the result, shown on a red background to illustrate that the artifacts are gone.

And there you have it.  Hopefully someone will find this useful!

Update…  I found myself having to do this with a very large number of images.  After spending a couple mind-numbing hours doing repetitive operations with GIMP, I figured out a way to script this using ImageMagick:

# produce averaged image
convert black.png -channel a -evaluate set 50% out$$.png
convert white.png out$$.png -flatten avg$$.png
rm out$$.png

# generate alpha mask
composite -compose difference white.png black.png out$$.png
convert -negate out$$.png mask$$.png
rm out$$.png

# apply mask to averaged image
composite mask$$.png -alpha off -compose Copy_Opacity avg$$.png output.png
rm mask$$.png avg$$.png

This works great, and looks to be a huge time saver.

Text Effects with GIMP

As part of my fledgling hobby/future side career doing game development for the iPhone, I’m becoming sort of an inadvertent GIMP expert.  I’m not a graphic artist, and I don’t do any original artwork for the games I code.  However, I often need to edit and re-touch existing artwork, which is where GIMP really shines.

One of my games has a nice, eye-catching title logo:

Hurry Up Bob! Logo

This logo came to me as a PNG image.  I wanted to add some extra text with the same look, so I decided to try to mimic it with GIMP.  Most of my GIMP knowledge comes from reading tutorials on the net, so I figured I’d “give back” and share how I did it.

The first step was to install the font in GIMP.  The font used here is “Addled Thin.”  I looked online and found a .ttf for the font, dropped it into GIMP’s fonts directory, and restarted GIMP.

Next, I created a text layer with the text I wanted.  The text size is 96px.  To set the text color, I used the color picker tool and selected the foreground color of the text, which is #FBAE5C in RGB notation.

Next, create the brown outline around the text.  Use the select by color tool to select the text, then choose Select » Grow.  Grow the selection by 5 pixels and click “OK”.  Then create a new layer and order it so it’s below the text layer.  Go back to the color picker and select the brown outline color from the original image (#5F3813).  Select the new layer and choose the bucket fill tool.  On the tool options, select the radio button to “Fill whole selection.”  Fill the enlarged selection with the new color.  This should give you outlined text:

Outlined text

Now move the text layer up relative to the outline, to create an offset look.  I moved it up 2 pixels.

Outline with offset

Now, we want to repeat this drill to create the black outer border.  Hopefully, you still have the original enlarged outline selection active.  Grow this selection by another 5 pixels, create a third layer, fill it with the dark outer border color (#14100D), and offset it by 2 pixels relative to the other two layers.

Dual offset border

Starting to look pretty good.  Next we want to use GIMP’s built-in drop shadow effect to create a shadow.  Before doing this, merge all of the layers together by choosing Image » Merge Visible Layers (or Ctrl-M).  Then choose Filters » Light and Shadow » Drop Shadow.  I set “Offset X” to 5, “Offset Y” to 5, “Blur Radius” to 5, and left the color as black and the opacity at 80.

Drop Shadow

Finally, add in the coarse gradient effect from the original text.  To do this, I selected a chunk of the gradient from one of the lowercase ‘r’s on the original, and copied it to the clipboard.  Then I used the Select by Color tool to select the original text again, and did Select » Paste Into several times to recreate the gradient inside the selected text.

Text with gradient and shadow

One thing to note:  if you look at the original text, the words are all rotated at various angles, but the gradient is always horizontal.  If you want the new text rotated, you’ll want to rotate it before adding the gradient.

And there you have it:  A pretty close approximation of the original text effect.  Here it is pasted into the game artwork:

Finished artwork

Moving Ubuntu to a New Hard Drive

Well, I guess it had to happen some time…  the system disk on my home Ubuntu server started going south recently.  Just a few errors here and there, but once it starts, it only gets worse.  So I thought I’d write down the steps I took to move my system to a new disk, partly for my own reference, and partly in hopes that someone else will find it useful.

First, grab a copy of a “live boot” Linux distro that will run off a CD.  I use Knoppix, but there are others available too.  Attach the new disk to the system, boot off the CD, and mount both the old and new disks.  Make sure the old disk is mounted with ‘errors=continue’ option so that it’ll keep going when errors are encountered.

Use “tar” to copy the root filesystem from the old drive to the new.  Example:

cd /oldroot

tar cvpf – . | (cd /newroot; tar xpf -)

You might want to capture the output of the tar command as well, so you can go back over it and see where it found errors on the old disk.  That way you get an idea if any important files might be corrupted.

When the tar command completes, make sure you have a more-or-less complete copy of the old root filesystem.  An easy way to do this is to run ‘df’ and make sure both copies take up roughly the same amount of disk space.

If your old disk has multiple partitions, you’ll want to copy these as well.

Shut down, remove the old disk, and jumper the new one (if necessary) so it appears as the same device.  Reboot into Knoppix and re-mount the new disk.

Install the grub boot loader on the new disk:

/sbin/grub-install –root-directory=/newroot /dev/sda

Some Linux versions refer to disks by UUID rather than device name.  If this is the case, you’ll need to go into /etc/fstab and /boot/grub/menu.lst and change the UUID to reference the new disk.  You can find the new disk’s UUID by looking in /dev/disk/by-uuid.

My old disk had a swap partition, and I didn’t create one on the new disk.  Instead, I commented the swap partition out in /etc/fstab, booted the system without swap initially, then created a swap area on the filesystem:

dd if=/dev/zero of=/swap bs=1024 count=4194304

mkswap /swap

swapon /swap

This gave me a 4-gig swap area.  To automatically add it at boot time, add to /etc/fstab:

/swap swap swap defaults 0 0

I’m sure I’ve left something out somewhere, but that’s the general idea.

Perl rocks

I’m doing a bit of tidying-up of my online music library for consistency..  editing tags, renaming files, that kind of thing.  My library consists mainly of FLAC files ripped from my CD collection.  My music player of choice on my Ubuntu box is Banshee.  Banshee has an “Edit Metadata” feature which looks very handy on the surface, but it appears to have a bug where it doesn’t actually save the metadata edits back to the file.  It does, however, update the metadata in Banshee’s internal database, so in Banshee, it appears that the changes have “taken”, but when I play the music files elsewhere it becomes apparent that the changes haven’t been saved out to the files.  Of course, I didn’t discover this problem until I had made edits to 250 files or so.  Nothing against Banshee here of course..  it’s free and no warranty was ever implied or expected.  But, I did have some files to fix.

Fortunately, as I mentioned earlier, the edits I made were saved in Banshee’s internal SQLite database.  So all I really needed to do was whip something up to compare the database with the actual tags in the files.  First, I dumped Banshee’s SQLite database to a flat file:

sqlite3 banshee.db 'select * from Tracks'

Then I wrote a quick Perl script that extracted the FLAC tags from each of the files in the database dump and compared them to the corresponding fields in the SQLite table:

#!/usr/bin/perl

use URI::Escape;
use Audio::FLAC::Header;

print "Key\tPath\tFLAC tag\tDB tag\n";
while (<>) {
    chop;
    my %dbTags = ();
    my($path);
    ($path, $dbTags{ARTIST}, $dbTags{ALBUM}, $dbTags{TITLE},
     $dbTags{GENRE}, $dbTags{DATE}) =
        (split(/\|/))[1, 3, 5, 9, 10, 11];
    next unless ($path =~ /^file:\/\//);
    next unless ($path =~ /\.flac$/);
    next if ($path =~ /\/untagged\//);

    $path =~ s/^file:\/\///;
    $path = uri_unescape($path);
    if (! -f $path) {
        print STDERR "Can't find $path\n";
        next;
    }

    my $flac = Audio::FLAC::Header->new($path);
    my $tags = $flac->tags();

    # Strip extra date info..
    $tags->{DATE} = substr($tags->{DATE}, 0, 4);

    for (keys %dbTags) {
        if ($tags->{$_} ne $dbTags{$_}) {
            print "$_\t$path\t$tags->{$_}\t$dbTags{$_}\n";
        }
    }
}

exit 0;

This script outputs a tab-separated file that shows all of the discrepancies, suitable for loading into your spreadsheet of choice.  I only had to make a small number of edits, so I made the changes manually with EasyTag.  But if I had wanted to take this farther, I could have had the Audio::FLAC::Header module actually save the corrections to the files.

Yet another reason to love Perl.

Laptop Travel Essentials

Being an intrepid occasional business traveler, I’ve come to rely on my trusty MacBook as sort of an office-away-from-home. Working while away from the office presents an interesting set of challenges. Internet access (particularly Wi-Fi) is becoming ever more ubiquitous, so getting connected is easy, but there’s no guarantee that a given Internet access point is secure — in fact, it’s most likely not. Working remotely often requires access to potentially sensitive data and resources that are protected behind firewalls and the like. It’s best to keep sensitive data off laptops, as laptops are easily stolen, and a data breech could land you on the 11:00 news, or worse.

This is a collection of tips, tools, etc. that I use to work securely with my laptop while on travel. It’s geared towards Macs, but much of it is applicable to other operating systems as well. Comments, suggestions, corrections, etc. are welcome.

SSH Tunnel Manager

A lot of organizations use VPNs to facilitate off-site access to private intranets, and ours is no exception.  I’ve never been a big fan of VPNs, because they all seem to rely on OS-specific drivers (or weird Java applets) that inevitably fail to work properly with my OS or web browser.  So, I avoid our VPN and use SSH tunnels instead.  All this requires is SSH access to a host with access to the intranet resource(s) I need.  With several well-crafted SSH tunnels, I’ve never found a need to use our VPN.

There’s one catch with SSH tunnels where laptops are concerned.  Setting up an SSH tunnel often requires feeding the SSH command a complex set of options.  When I’m on travel, I’m constantly moving from place to place, and bringing my laptop in and out of sleep mode.  This causes the SSH connections to time out, and I end up having to re-initialize all my tunnels every time I want to work on something — a big pain.  This is where a good SSH tunnel manager helps.  A tunnel manager maintains a list of tunnels and lets you start and stop them with a mouse click.  There’s a decent app for OS X called (surprise) “SSH Tunnel Manager,” and PuTTY does a nice job on Windows.  For Linux, I like gSTM.  With the SSH Tunnel manager, I’m up and running in seconds after starting up the laptop, and I don’t have to remember complex SSH command-line options.

Firefox Proxy-switching Extension

Secure web-browsing is a primary concern when traveling.  As such, I do all my browsing through SSH tunnels, which ensures that all my browser traffic is encrypted.  For general purpose browsing, I use a tunnel to an ad-filtering proxy running on a server in my office.  For work related stuff, as well as online banking and related things, I use a SOCKS proxy.  There are a couple other configurations I use as well.  Each of these requires a different proxy configuration in Firefox.  As shipped, Firefox only allows you to define a single proxy configuration.  There’s no support for multiple proxy configurations; if you want to change your proxy, you need to go in and manually update the settings each time.  Proxy-switching extensions allow you to define as many proxy configurations as you want, and switch between them quickly and conveniently.  I’ve found them to be indispensable.  There are a bunch of proxy-switching extensions out there, but my favorite is SwitchProxy, because it seems to be the best balance between simplicity and functionality (note that the stock version of SwitchProxy doesn’t run on Firefox 3, but I found a modified version that works nicely here).

Foxmarks

Foxmarks is a Firefox extension that synchronizes bookmarks between different instances of Firefox.  With Foxmarks, I now have the same set of bookmarks at work, at home, and on my laptop, and when I change my bookmarks in one place, all the others stay in sync automatically.  I’ve been running separate Firefox installations on different computers forever now, and I only recently discovered Foxmarks.  It’s one of those things where once you have it, you wonder how you got along without it.

VNC

VNC, or Virtual Network Computing, is a remote desktop-sharing technology.  It’s similar to Microsoft’s Remote Desktop service, but it’s an open standard and is platform-independent.  It allows me to pull up a virtual desktop and access data on a remote server as if I were physically sitting at the server.  This is a great way to keep sensitive data off my laptop — I just manipulate it remotely.  All of the connections are made through SSH tunnels. (what else?)

VNC is one of those things that I keep finding more and more uses for as time goes on.  I use it to access various GUI-based apps on my home and work PCs while traveling.  It’s particularly useful for running the occasional Windows or Linux-based app that I don’t have available on my Mac.  For example, I use GnuCash to track all of our household finances.  It’s installed on my Linux server at home.  With VNC, I can connect to my home server, run GnuCash remotely, and keep up with the finances while I’m away from home.  No need to run it locally on the Mac and worry about the data getting out of sync.

My favorite VNC client for the Mac is Chicken of the VNC.

FileVault

FileVault is a file-encryption system that ships with OS X.  It will transparently encrypt and decrypt files on the fly, using the user’s account password as a key.  I haven’t used it before, but I am going to give it a go with my new laptop.  It seems like an easy way to protect sensitive data that inadvertently finds its way onto the laptop.  In the event the laptop is stolen, the thieves will at least have to work harder to get at the data.

And there you have it.  I’m sure I’m leaving something out that will become apparent the next time I travel.  One thing I’d like to have is some sort of theft recovery software.  Haven’t yet looked into what’s available in that department.

Latest Ubuntu Upgrade

I just upgraded my Ubuntu box from 7.04 (Feisty Fawn) to 7.10 (Gutsy Gibbon), and after 3 upgrades (I started out with Dapper Drake) I remain impressed with how easy and painless it is. This time there was a hiccup, though. But, it’s not something that I’d expect an average user to encounter.

First, a bit of background. My desktop machine gets a lot of its files via NFS from a remote server. The server runs a base of Debian Etch with a bunch of stuff from the testing/unstable trees. The two computers are both on the same LAN, and the server currently runs kernel v. 2.6.20.1. Ubuntu 7.10 currently uses 2.6.22.

After completing the upgrade, I rebooted my machine into Ubuntu 7.10 for the first time, and logged on. It took about 5 minutes for all my menus and apps to come up (some of the apps came up before I had any menus, making me wonder if the upgrade had botched something.. but everything did finally appear). I quickly figured out the cause of the problem: all of my NFS mounts were timing out.

I did a few more tests, and I found out that I had no problem mounting and unmounting NFS directories from the server. But when I tried to run ‘ls’, my terminal just froze and I got ‘NFS server blah.blah not responding’ in the kernel log. No amount of rebooting, re-exporting filesystems, etc. seemed to help. I wondered if it was some sort of subtle incompatibility between the two different kernel versions, although I’d never had this kind of issue with NFS before in my almost 20 years of dealing with it. (Wow, has it really been that long?)

I’m aware that there are two versions of NFS nowadays, the older version 3 and the newer version 4. The 2.6 kernel supports both versions, but I’ve always run version 3 because it has always worked for me, and I’ve never seen a need to change. Plus, when I go to configure my kernel, all of the NFS v4 stuff is labeled as EXPERIMENTAL, which makes me shy away from it. This time, though, rather than futzing around trying to get my old NFS v3 setup to work again, I decided to try v4. I built it into the server’s kernel and rebooted the server. I then followed the very helpful Ubuntu NFSv4 Howto, which explained the differences between v3 and v4 and walked me through the setup.  It worked, and it doesn’t hang any more.

It’s a little troubling not knowing why the upgrade broke my NFS v3 setup.  Searching around on Google wasn’t too helpful.  I suspect it’s some kind of issue with the 2.6.22 kernel, but I did not want to spend a lot of time troubleshooting it..  I just need my computer to work.  So I’m glad NFS v4 fixed it for me, otherwise I’d probably have to downgrade back to Feisty.

NFS issue aside, the Gutsy upgrade was very smooth, and I continue to be happy with Ubuntu.