Instant Hot Water Tank Repair

One of the must-have appliances in our kitchen is an instant hot-water tap. Once you’ve gotten used to instant cups of hot tea, you’ll never want to be without one. Unfortunately, while these gadgets are a great luxury, they have a reputation for being unreliable. The most popular brand, In-sink-erator, is well known for lasting 2 or 3 years before the tank starts leaking. Indeed, that’s what happened to ours, while it was still under warranty. We contacted In-sink-erator, and they helpfully shipped us a brand new tank at no cost. The only problem was that the new tank also leaked. The ultimate solution was to replace the In-sink-erator with a different brand, a Waste King. The Waste King seems like a better made unit, and it’s been working fine for a month or so now, but the jury is still out as to its longevity.

With our family happily tapping instant hot chocolate again, I decided to take a closer look at the leaky In-sink-erator tanks. I wanted to pinpoint where they were leaking and see if I could repair them. It’s next to impossible to find leaks while the tank is in service, because it’s under the sink where it’s hard to get to, and the tank’s internal plumbing is hidden behind the case and the styrofoam tank insulation. The best way to find the leak is to take the tank and faucet out of service, remove the case and insulation, hook the faucet up to a temporary water supply, turn the water on, and look for the leak. The In-sink-erator faucet attaches to the water supply with ¼” copper tubing with compression fitting.  I went to my local Lowe’s and picked up a ¼” compression to ½” male NPT adapter, and a ½” female NPT to female garden hose adapter, and used these to hook the faucet and tank up to my laundry tub faucet. With the case and insulation off the tank, I was able to pinpoint the leaks in both my original and replacement tanks.

The In-sink-erator tanks have a well-known issue where the plastic tubing fails between the tank and the backflow reservoir.  It turned out that this wasn’t the problem with either of my tanks.  On both my tanks, the culprit was a plastic bulkhead fitting: the original tank leaked at the water supply fitting at the top, and the replacement leaked at the drain fitting on the bottom.  These fittings don’t appear to be serviceable, so the only option appears to be to replace them with higher quality bulkhead fittings.  In the meantime, I salvaged a useable tank by using the top half of the replacement with the bottom half of the original.  We’re happy with the Waste King dispenser for now, but if and when it fails, we now have a working In-sink-erator that we can fall back on.
Grout Removal Finally Finished

So yesterday, about a year after starting, I finally finished grinding the grout out around the master bathroom tub.  This is not a job I’d recommend doing with older tile, unless it is really valuable and/or has historical significance.  It’s boring, dusty, tedious, and time consuming.  Did I mention that it’s dusty?  That cannot be understated.  Our tile is very close together, with very narrow grout joints.  They’re too narrow for a 1/16″ Dremel grout bit.  I removed our grout with a Dremel diamond wheel, coupled to a right angle driver attachment.  It worked, but it kicked up a LOT of dust.  We have a layer of fine grout dust covering everything in the bathroom.  It can also be fatiguing, particularly on overhead sections.  When your arms get tired, it’s easy to slip and scratch the tile glazing with the tool.  I burned through 2 diamond wheels on this job.  You can tell that a wheel is shot when it’s lost around 1/8″ of its diameter, and it starts kicking up a lot of sparks and not cutting as well.

Now that the tub is finally grout-free, the next steps are to

  • Clean up.  Wipe everything down with a wet rag, top to bottom.  Sweep up piles of loose grout dust with a dust pan.  Let surfaces dry, then vacuum up remaining dust with shop vac.  Then wipe with wet rag again.
  • Clean tiles thoroughly and prep for new grout.  Knock out and clean up any grout I couldn’t get to with the Dremel.  Remove old caulk in a couple of spots.
  • Regrout the tile.
  • Misc improvements (new in-shower light fixture, faucet handles, shower head, exhaust fan, etc.)
  • Put in new shower door.

I won’t be doing this again in this house.  Our tile is not nice or historic enough to be worth the effort.  It’s easier to rip everything out and start with new wall board and new tile.  That’s what we’ll be doing when we get around to remodeling our other bathroom(s).

Grout Removal

Nothing much exciting to write about on the biking front lately.  I was off work last week, and didn’t do much biking, but this week I’m back at it again.  August has brought some slightly more pleasant weather so far, but still not much in the way of rain, other than the occasional torrential downpour.  In other words, business as usual for mid-summer in Maryland, more or less.

Been doing a little bit of work in our master bathroom lately.  We decided to re-grout the bath tub and shower area, because a lot of the old grout was either in bad shape or gone altogether.  Also, the shower door, likely a 1950s original, was shot (the rollers at the top were corroded to the point where they wouldn’t turn any more).  The first step to re-grouting is to remove the original grout.  According to everything I read, there’s no getting around this step, if you want the new grout to last.  Problem is, grout removal is a slow, boring, dusty job.  Over the course of the last few months, I’ve spent countless hours with my Dremel and my cartridge respirator, grinding away at the stuff, and I’m still only around 75% done (granted, this is a larger than average job, with 3 full walls and ceiling fully tiled – probably around 100 sq. ft. of tile).  The good news is, I can finally see the light at the end of the tunnel.

This tile was initially challenging to work with.  Dremel sells a specialized grout removal bit and guide, but I couldn’t use their system because my tile was too close together.  I would end up grinding away the edges of the tile along with the grout.  I ended up using the Dremel with a right-angle adapter and a diamond wheel.  It was skinny enough to get into the gaps between the tile, and relatively easy to control, although there have been a few spots where I’ve nicked the tile glazing.  I’ve completely worn through one diamond wheel and am on my second now.  Looks like the entire job is going to cost me two diamond wheels.  Fortunately they’re not all that expensive — around $17.

Once we’ve re-grouted, we’ll replace the faucet handles and trim, the shower head, and the recessed light at the top of the shower, then install the new shower door, which we’ve had since last September.  I think the end result will look pretty nice, but this isn’t a job I would want to do again.  If we ever redo the other bathroom, I’m going to argue in favor of ripping out the (beautiful 1950s retro-pink) tile and re-tiling.

Chlorine Generator Manifold Repair

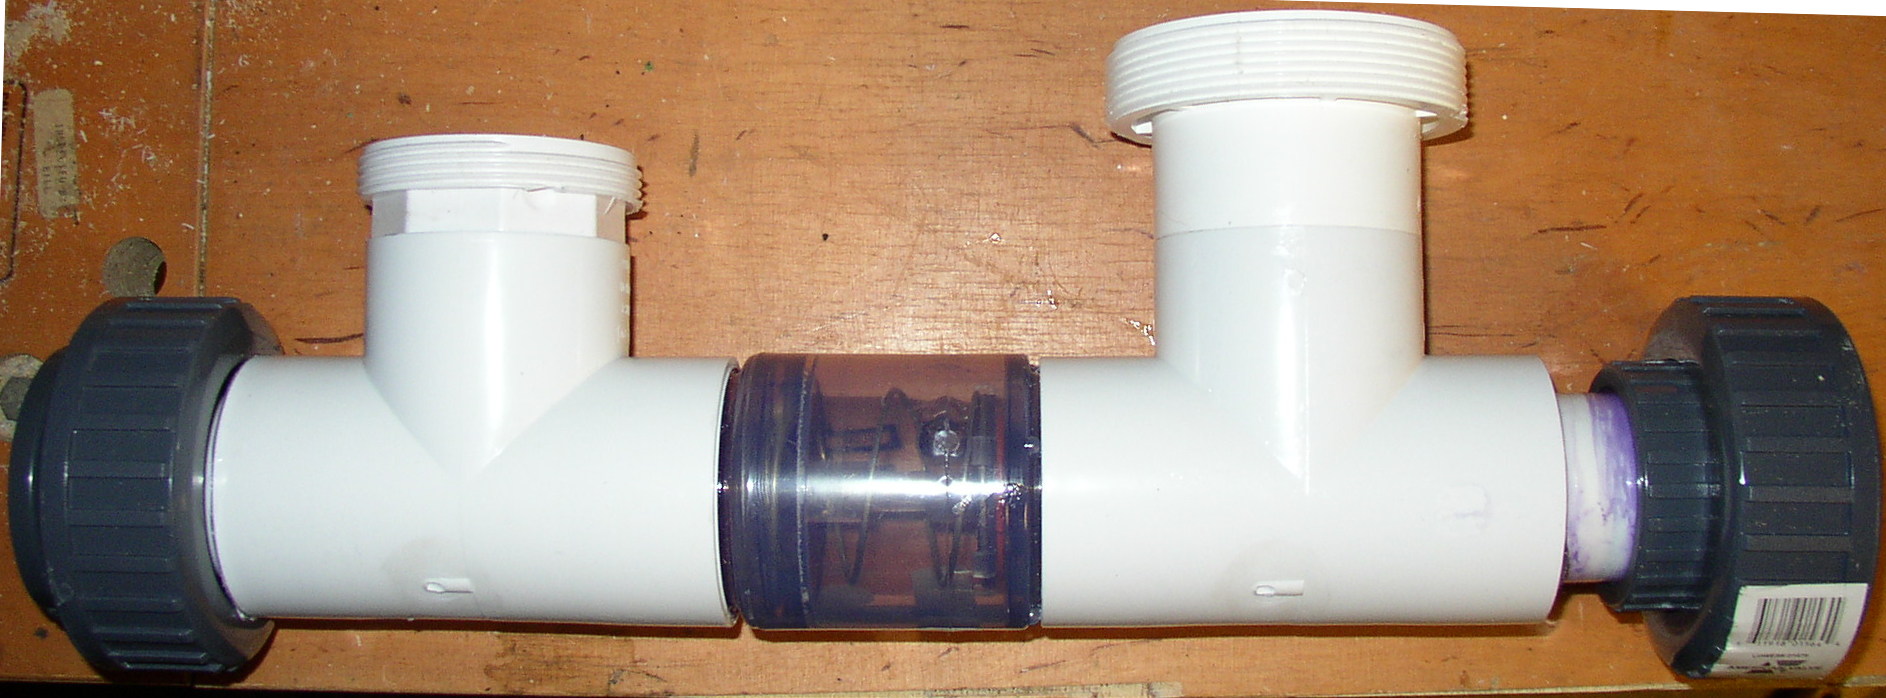
I’m in the process of installing a salt-water chlorine generator (model DIG-60 from AutoPilot) for my swimming pool.  As part of this, I need to plumb the salt cell in downstream of my filter.  The cell is part of a big inline manifold which includes a 3lb spring check valve.  The valve’s purpose is to limit the water pressure going through the salt cell, theoretically extending the cell’s life.  Anyhow, as I was preparing to install the manifold, I dropped it (don’t ask) and the check valve broke away from one of its adjoining tees:

Broken AutoPilot Manifold

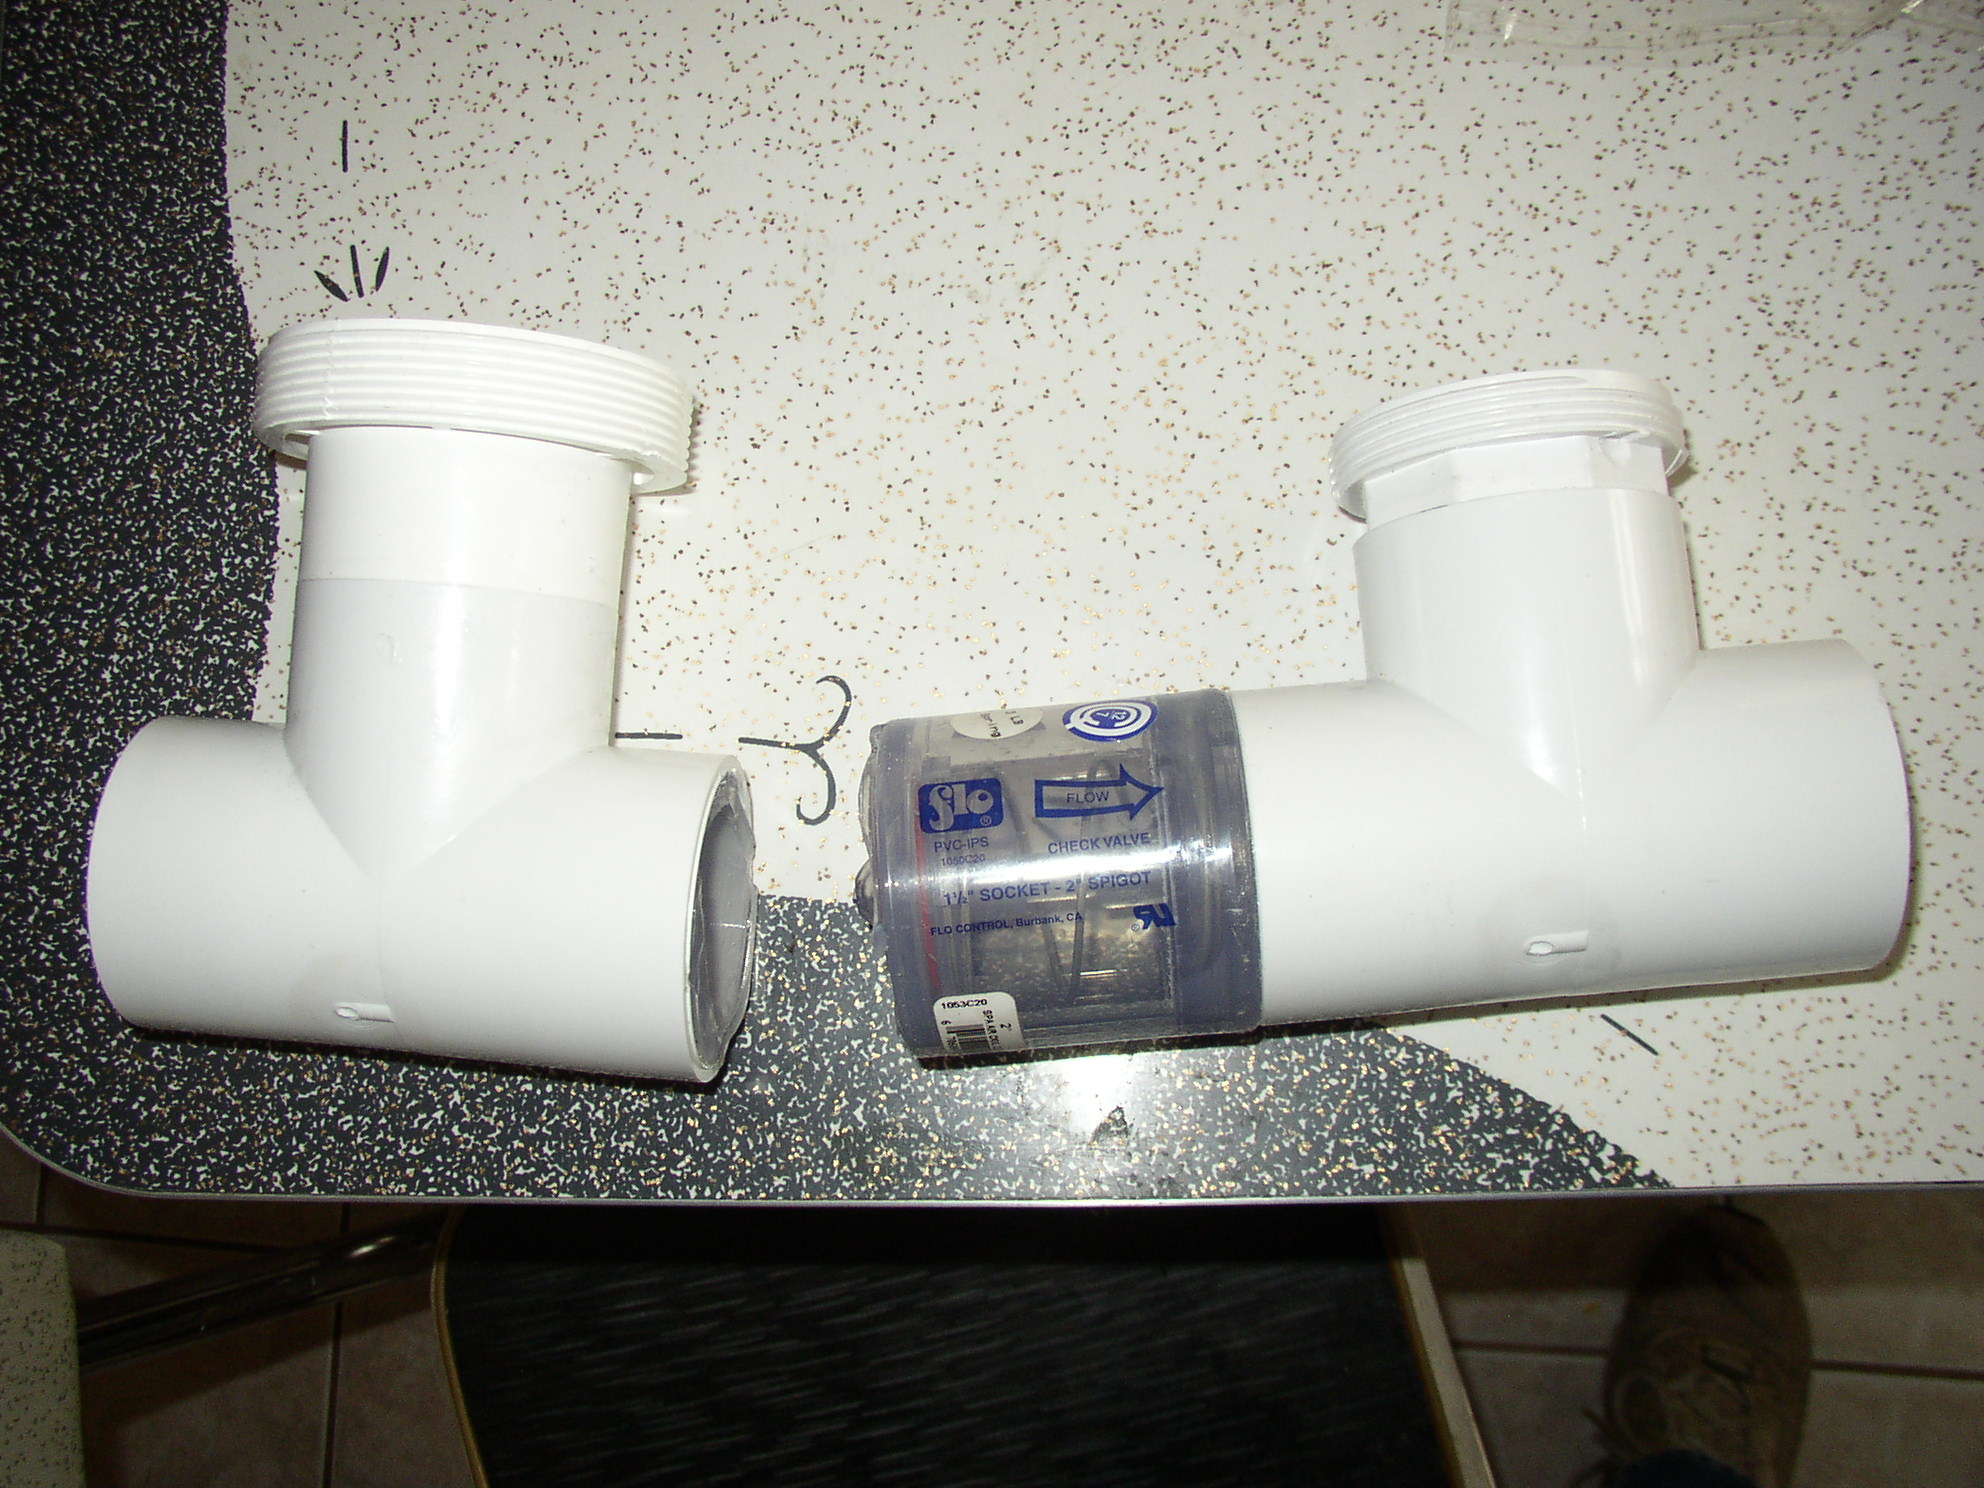
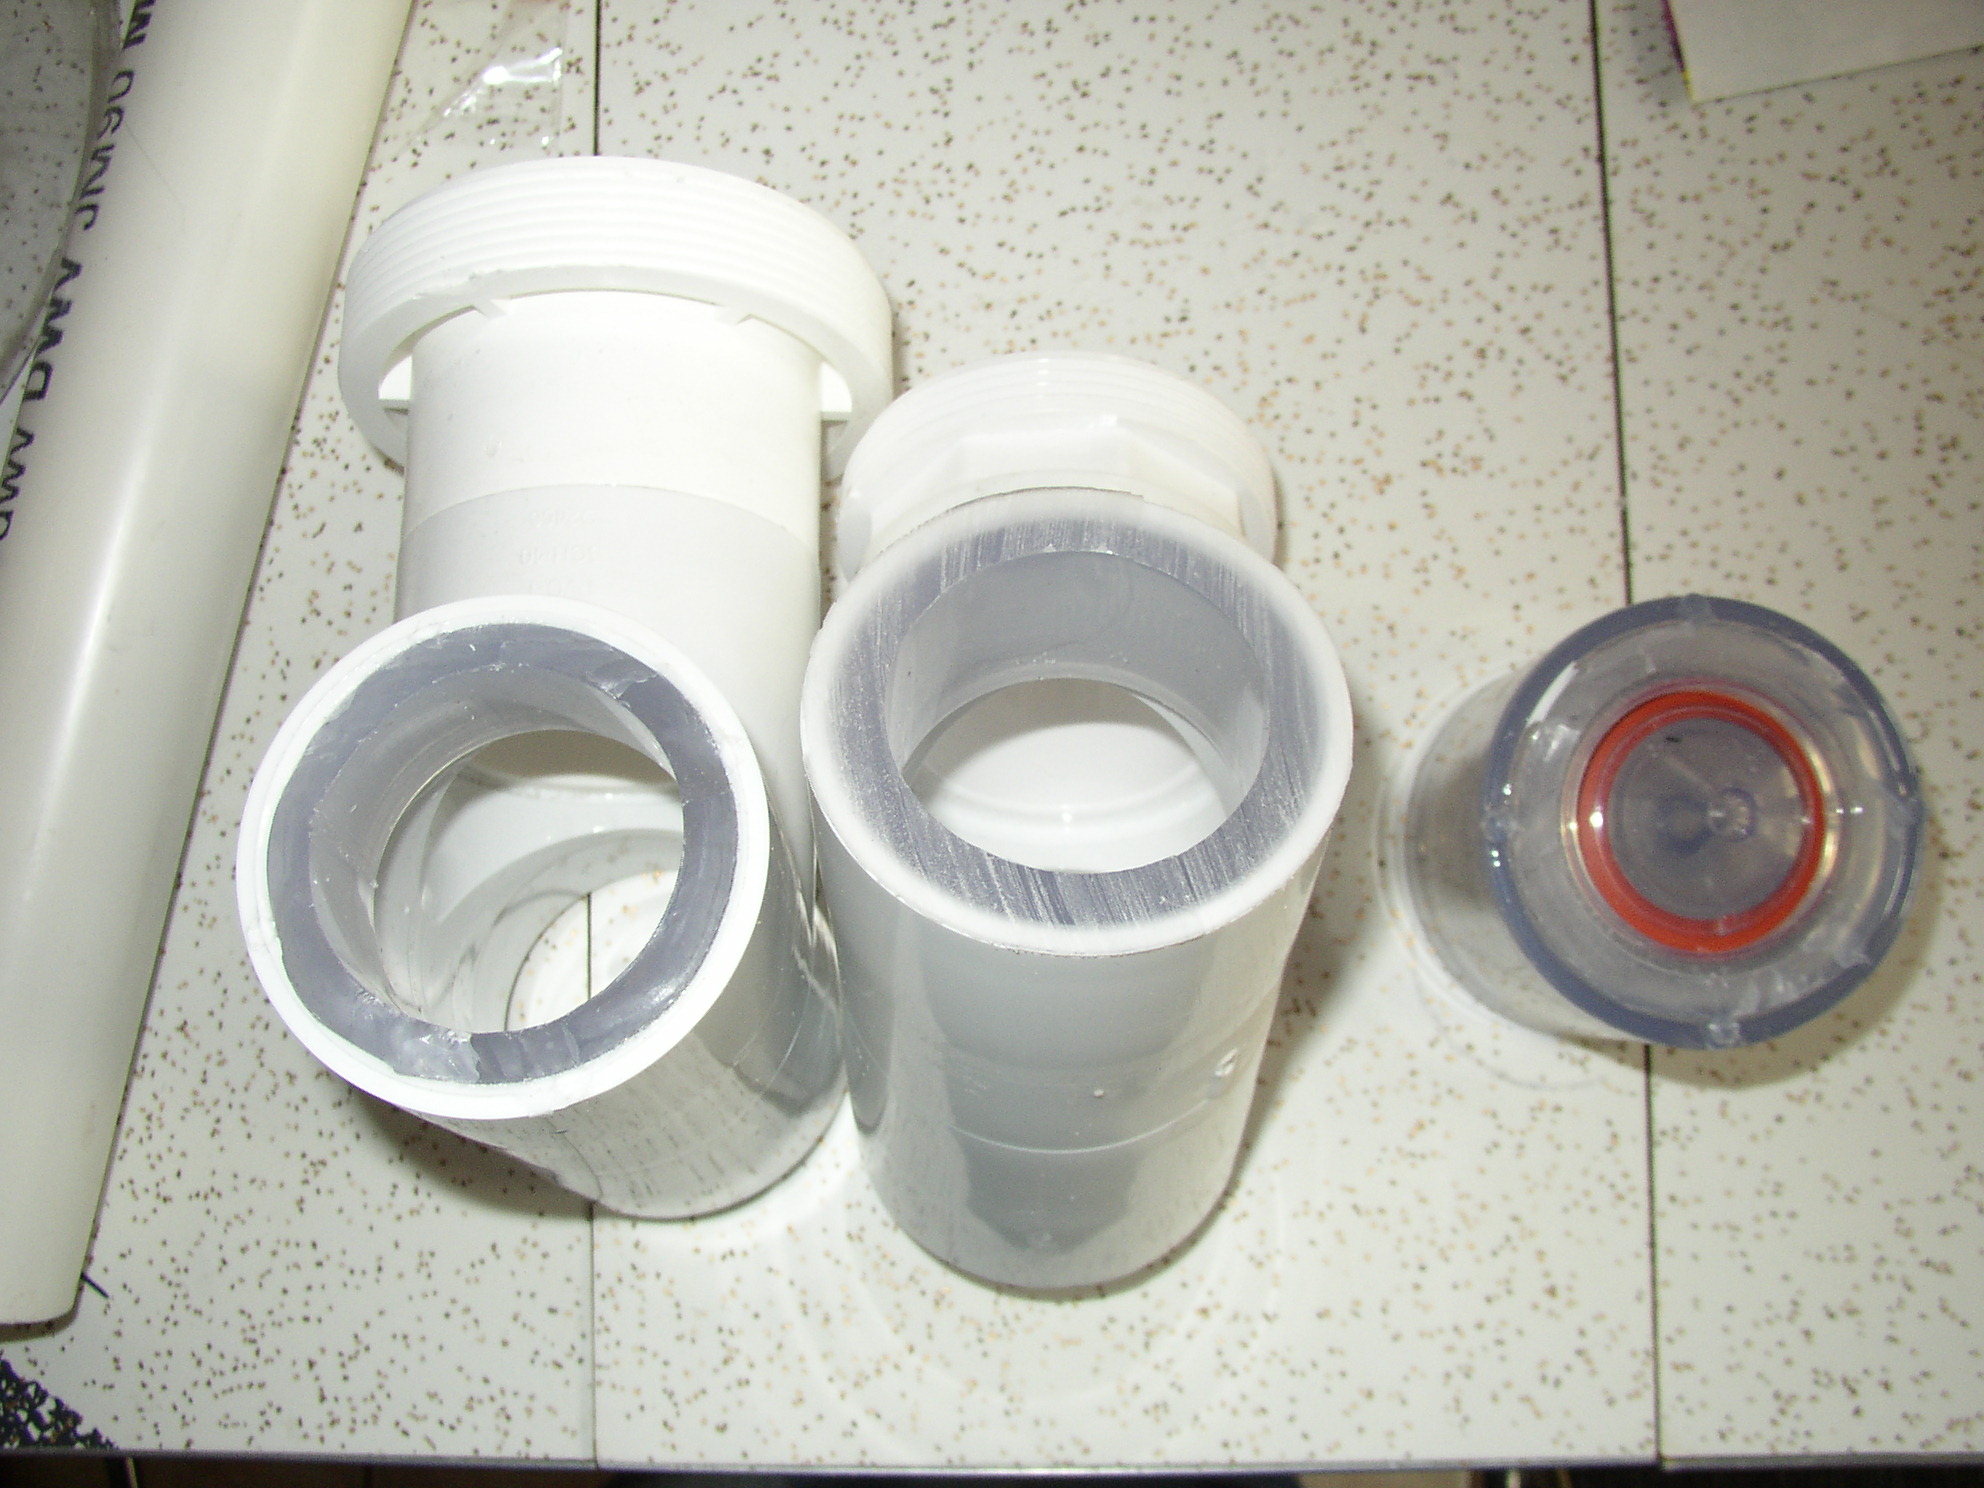
What to do here?  The whole manifold is solvent-welded together, and the tees are attached to proprietary unions.  At first glance there appeared to be no way to fix it other than ordering a replacement manifold, at a cost of over $100.  By contrast, a replacement check valve can be had online for $15-20.  So I decided to think outside the box a bit.  The check valve is made by Flo-Control and is commonly sold as an air check valve for spa blowers.  It has a 1½” socket and a 2″ spigot, meaning one can either attach a 1½” pipe “inside” it, or a 2″ pipe “around” it.  AutoPilot ships it with 2″ tees cemented to either side, which attach to the pool’s plumbing.  My pool has 1½” plumbing, so I would ordinarily need a reducer bushing to attach to the tees on the manifold.  When the manifold broke, the 1½” socket end of the valve was left stuck inside the tee.  Eventually, it occurred to me that if I cut the other tee away from the valve, I could flip the tees around and cement a new valve to the intact ends. The other ends, with the remains of the original valve, would then accommodate my 1½” plumbing without the need for reducer bushings.  It seemed like a great plan, so I pulled out my trusty miter saw and cut the intact tee away from the old valve, leaving me with 3 pieces:

AutoPilot Manifold Parts

I then went online to look for a replacement valve, and promptly ran into another problem.  It turns out that this particular valve is sold in a bunch of different spring weights:  .75, 5, 10, and 15 pounds, to name a few.  The version that ships with the AutoPilot has a 3lb spring.  And here’s the problem:  I wasn’t able to find the valve with a 3lb spring anywhere.  It’s not even listed on Flo-Control’s web site.  They’re apparently made special-order for AutoPilot.

Makeshift check valve spring removal tools

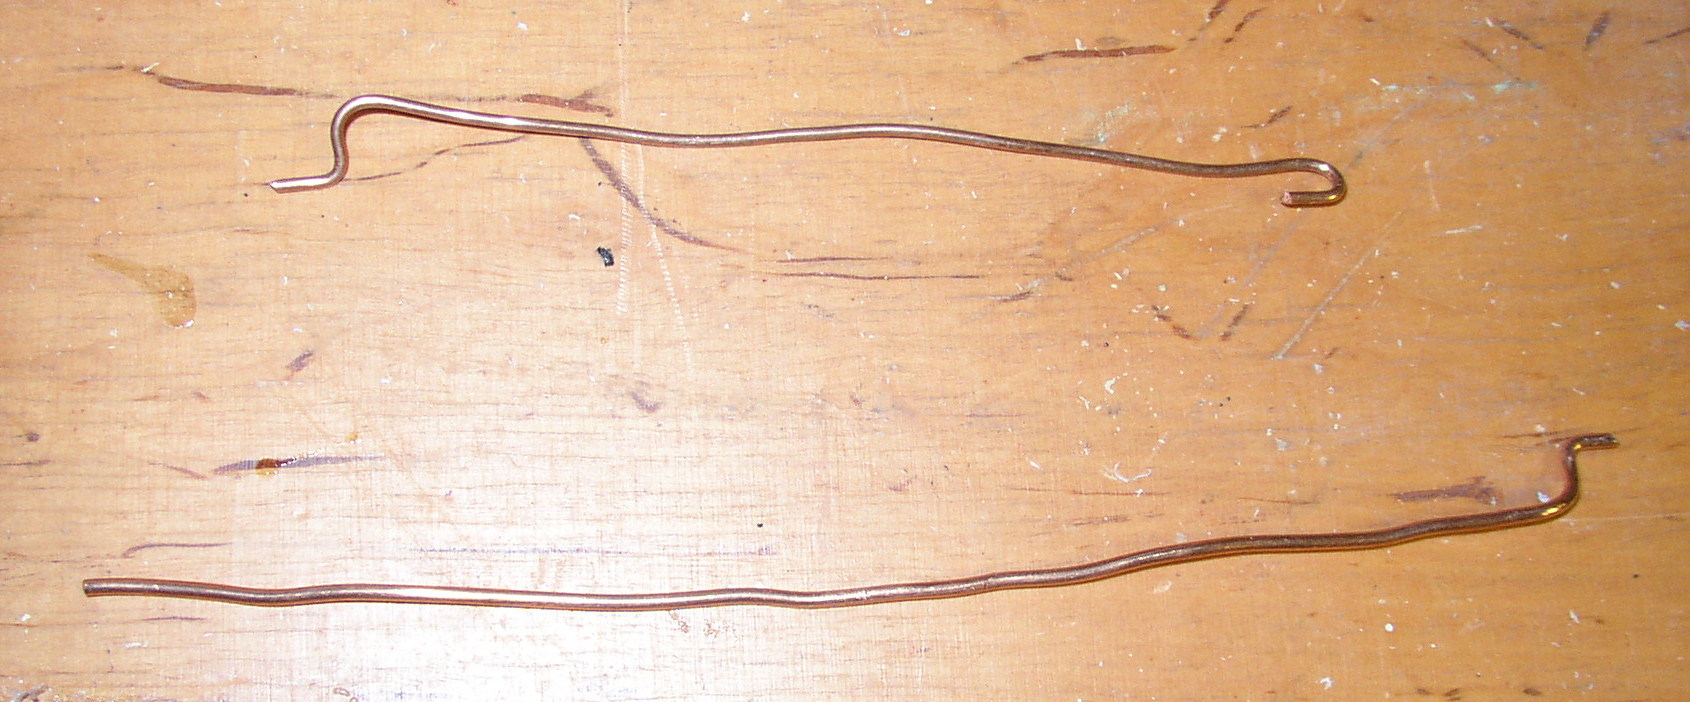
Undeterred, I wondered if I could remove the spring from the broken valve and reuse it in a new valve. With the help of a couple of makeshift “spring removal” tools I fashioned out of copper wire, I was able to extract the spring. As a proof-of-concept, I then replaced the spring with the help of some needle-nose pliers.  Encouraged, I went ahead and ordered an identical valve with a .75lb spring.  I chose the model with the lightest spring I could find, figuring it’d be the easiest to get out without damaging the valve.  The valve arrived a few days later, and happily, it was identical to the original valve, other than having a different weight spring and not being broken.  The lighter-weight spring easily came out of the new valve, and with a little effort I was able to insert the 3lb spring.  Turns out direction matters when re-inserting the spring:  it initially wouldn’t seat properly, but when I flipped it around it went right in.  With that, I had a working, non-broken 3lb check valve.  I then cemented the two tees onto either end of the valve, completing the repair:

Repaired AutoPilot Manifold

All that’s left to do is plumb it in and make sure it works.  Assuming it does, my little accident (dropping the manifold) cost me a lot less than I had feared.

More fun with digital TV

The great digital TV antenna project continues.  I found out that the cheapie UHF antennas I built are known as “4 bay bowtie dipoles,” and they are very similar to the Model 4221 by Channel Master.   Based on my reading, I’ve decided not to try using a combiner to join the antenna signals.  Instead I picked up a remote control A/B switch at Radio Shack, model 15-1968, and it seems to work great.  I’m going to buy a second one for our other TV.  Providing most of your stations are in 1 of 2 different directions (as mine are), this switch is a great alternative to a rotator.  In particular, multiple TVs can watch signals from different antennas simultaneously, which is not possible with a rotor.  The down side, of course, is that you need to run two separate antenna cables to each TV.  But that only needs to be done once.  I’ve also ordered a couple of Sony model RM-VL600 universal remotes, based on all the positive reviews.  My hope is that I can use these to work the A/B switches.  We’ll see how they work out once they get here.

I may need to move my Baltimore antenna.  It’s aimed NNE directly at TV hill, but there are a lot of tall trees blocking its path.  It seems to pick up most of the Baltimore stations just fine..  WMAR-2, WBAL-11 and WBFF-45 all come in perfectly with 95%+ signal strength consistently and no dropouts.  WJZ-13 is my problem child, though.  I was watching it this afternoon and it started dropping out as soon as the wind kicked up.  Wondering if the frequency WJZ-DT is currently using has something to do with it — WMAR, WBAL and WBFF are all currently at the higher end of the UHF spectrum, while WJZ is lower at 38.  Dunno, but I’m going to try moving the antenna to the other end of the house, where it can hopefully get a clear shot through the foliage.  Just need a longer length of RG-6.

All bets are going to be off come February 2009, when a lot of these stations will be shifting back to the VHF band.  At that point, I may need to add a VHF antenna to my setup.  Looks like all of my local stations will end up on the high VHF band (channels 7-13), so I should be able to get by with a smaller VHF antenna.  I’m going to hold off before I do anything, though.  My current antennas seem to pick up the analog channels in the VHF-hi band pretty well, so they may do the job with the digital channels.

Stay tuned..  (no pun intended)

Taxes, painting and stuff

It’s been a while since I wrote anything here, mainly because I have been swamped at work, getting ready for a presentation next week at Educause, my first foray into public speaking since, oh, 1995 or so. That was back in the days of transparencies, so it’s been a while. And I do have to say, there are much better tools around for preparing slides nowadays. But anyhow, it’s been pretty all-consuming writing up this presentation, and by the time I get home I haven’t been much in the mood to write anything else.

Interesting tax-related development here in the People’s Republic of Maryland. It seems that the legislature has raised the personal exemption amount for 2008 a whopping 33%, from $2400 to $3200. This is the first time Maryland’s personal exemption amount has changed since 2002, when it rose from $2100 to $2400. Apparently this is the legislature’s way of providing relief to the “working families” they are always harping about. This is in contrast to the governor’s original plan that would have widened the lower-income tax brackets, and being a flat tax advocate, I think it’s a better idea, although it benefits fewer people. For a typical family of four (like us.. imagine that) this results in $3200 less taxable income in 2008 than in 2007. Maryland has also completely overhauled how they figure payroll withholding. For me, that resulted in about $27 less state tax being withheld from my paycheck. This seems like a lot. According to my handy spreadsheet, an exemption amount of $3200 would have resulted in $254 less in taxes owed in 2007. Extrapolating the $27 withholding difference out to 26 paychecks results in $702 less tax withheld in 2008, leaving me $448 in the hole. There must be something I’m missing here, or I’m going to have to tweak my withholding exemptions again.

In other, less exciting news, we are finally getting ready to paint the master bedroom, several years after buying the paint. In preparation, I’m putting in a new phone jack. The original jack was one of those “woodwork warts” that was surface-mounted to the trim. I hate these, so I’m getting rid of them as we paint the rooms, in favor of flush-mounted wall jacks. This will be the first phone jack I’ve rewired, so I’m going to do it right and use twisted-pair cable with a Leviton “QuickPort” punch-down type jack. In the basement, I’ll install either a patch panel or a 66-type punch-down block (haven’t decided which yet) and splice it into the old quad-conductor cable that makes up the rest of the house’s phone wiring. Then as I replace jacks down the road, I’ll replace the quad with Cat-5. Doing this might improve our DSL speeds, too.

Bedroom wiring finished

Finished up the master bedroom fan switch wiring this weekend. It turns out that after I removed the downstream wiring from the box, I was able to fit the switch in the box just fine. No need to muck around in the attic pulling new wire. Five years ago, when I had more time on my hands, I probably would have pulled that wire. But now, if there’s a shortcut to be taken, I’m taking it.

I also replaced the rest of the outlets in the room. On the last outlet I replaced (the outlet to the left of the closets, behind Cathy’s dresser) the outlet box was a little screwed up… kind of hard to describe, but it’s one of those boxes that can be expanded by removing the side and ganging it together with another box. And anyhow, the removable side, which was attached to the adjacent stud, was loose, and the rest of the box was a little loose and crooked. I fixed it up the best I could, but in a perfect world, the box should really be replaced. Again though, that’s one to put on the list for some mythical time in the future when I have lots of spare time.

I also winterized the pressure washer and finished hooking up the unloader line on the air compressor. As of today, I haven’t yet managed to psyche myself up enough to turn it on and see if it works.

So all in all, not a bad weekend around the house.

Wiring: Plan B

As is often the case with these things, I hit a snag trying to fish wire from the attic to the basement for my bedroom rewiring project. I encountered some horizontal blocking in the stud cavity which prevented me from running the wire all the way through. That basically left me with three choices:

  1. Press forward and try to run the wire through the cavity as planned, turning most of my hair gray and losing several years from my life expectancy in the process;
  2. Try to find an alternate stud cavity to run my wire; or
  3. Come up with another plan altogether.

I’ll admit, I briefly considered #1. I’ve fished wire through some tight spots in my day, and if I’m determined enough, I could get the wire through, horizontal blocking and all. But if there’s an easier way, I’d rather not deal with the frustration.

#2 might work. I fished wire through a different stud cavity for a similar project a couple years back, and had no problems. But it’s really kind of a crap shoot, and I’d rather not drill tons of holes all over the place just to find a clear shot from the attic to the basement.

All this brings us to #3. After consideration, I decided to tap into some existing wiring in the basement instead. It turns out there’s a nearby circuit that has only a single outlet on it (used to be for a window air conditioner). So I’m going to tie the wiring into this circuit. Simpler and easier than trying to fish through the wall.

Moral of the story: the first plan you come up with is not necessarily the best or easiest, so don’t get set on it.

Browse NFPA codes online

I just found out that The National Fire Protection Association has a method you can use to browse all of its publications online. This includes the National Electrical Code and its associated offshoots. This is really nice, because printed versions of the NEC (NFPA 70) sell for upwards of $60, and then you still need to get NFPA 7A, which specifically covers single- and double-family dwellings. And on top of that, the codes are updated every three years, at which point you need to buy all-new copies if you want to stay up-to-date. This is a little pricey for a weekend shade-tree electrician like me. However, a copy of the NEC is essential if you want to do safe, code-compliant work that will be approved by an inspector. It’s always been frustrating to me that these documents cost so much — no one, be it contractor or homeowner, professional or amateur, should be required to pay for what is ostensibly a book of requirements. IMO, the high price point of the printed NEC promotes shoddy, non-permitted, non-compliant work, which is not good for anyone.

Now, all is not perfect. NFPA still wants to make money selling hardcopy and PDF versions of the code, so the free access you get is a bit crippled. It works via a Java applet that doesn’t allow printing, cut-and-paste, or search. However, it’s better than nothing, and I have to give props to NFPA for recognizing the importance of providing easy access to these codes. There are certain things that are more important than making money..

Oh yeah.. here’s the link.