Stud Test

This morning, at long last, I was able to give my studded tires their first true test.  We got around an inch of snow Saturday, followed by a nice glaze of ice, plus a little bit of melting and re-freezing action on Sunday and Sunday night.  As a result, I had a nice variety of road conditions on which to try out the tires this morning.  For the record, these are the “Marathon Winter” tires by Schwalbe, 26″x1.75″, and I’m running them on a 1993 Specialized Rockhopper.  These tires are designed mainly for traction on icy roads, more so than for deep snow.  Each tire has 200 studs and the tread is not very aggressive.

Most of the roads on my commute were salted into oblivion, and pretty clear.  The only icy spots were on overpasses.  The real fun was in the state park.  The access road I ride into the park never gets touched in the winter, and it was still covered with 1″ of snow, with footprints and tire tracks from those who braved it before me.  Despite the Marathons not being snow tires per se, I was able to plow through the snow pretty confidently, with just a bit of side-to-side deflection from the ruts.  I wouldn’t even think of riding through that on one of my road bikes.  Any more snow, though, and I would have been hiking it.  The roads and paved trails inside the park appeared to have been plowed but not salted.  There was a lot of ice everywhere, and the tires handled it extremely well, with no slippage at all.  I’ve never felt more confident riding on ice.  I was actually purposely riding through ice in spots where I could have avoided it.  It kind of reminded me of my first ride with fenders, splashing through puddles just for the hell of it.

Anyhow, we have another warmup coming for later this week, so it may be awhile before the tires get tested again.  I’d like to test them out on some really hard-core ice, as opposed to the slippery-slushy stuff we had today.  This winter just hasn’t been cold enough for that.  I guess we’ll see what February brings.

Mid January Biking Report

Thanks to our continued warm winter weather, I’ve started off 2012 on a biking tear.  I’ve already ridden to work 9 times, reaching that mark a week earlier than any previous January.  The spreadsheet I use to track my rides tells me that I’m on pace for 259 total rides and 5617 total miles in 2012.  Somehow I doubt that I’ll get quite that many, but at this pace, 180 sure seems attainable.  I’m sure we’ll eventually get some winter weather this year, but for now, I’m enjoying the salt- and ice-free roads.  The studded tires I put on back in November still have yet to be tested in true winter conditions.

I received a Merino wool t-shirt as a Christmas gift, and so far I am really liking it.  It is the “Minus 33” brand.  In the past, I’ve always worn t-shirts or jerseys made out of synthetic fabrics, by themselves in the summer and as a base layer in the winter.  The problem with them is that they only last a ride or two before they start to (ahem) smell funky.  The mean time to smelliness seems to be inversely proportional to the amount of sweating I do.  When you ride 4 to 5 days a week, you end up washing a lot of shirts.  I was attracted to wool due to its ability to resist odors, which is one of the reasons I swear by wool socks.  So I figured I’d give a wool t-shirt a try, and so far I haven’t been disappointed.  This shirt has gone through 5+ rides now, and still no hint of any funky odor.  The real test will be to see how it does in the summer.  For the Minus 33 brand, I got an extra large, and initially was a little worried that it’d be too big for cycling.  However, it ended up fitting just fine.  I am 6′ and around 180lbs, and the fit is comfortable but not form fitting.  We’ll see how it fares after the first time I wash it.

Another GIMP Trick

Recently, I had occasion to convert a few shapes extracted from a flash movie to PNG format.  I used the excellent swftools suite to extract the shapes from the movie, and then I used  Gnash to render the shapes and save PNG format screen shots. This works great, but unfortunately, the resulting image is missing the alpha channel, and its background is white.  I wanted a way to restore the shape’s transparent background.

One easy way to restore transparency is to use GIMP to select all the white background pixels and “erase” them to make them transparent.  Unfortunately, that’s not quite good enough.  That’s because anti-aliased images have “semi-transparent” pixels around the edges, which show the white background underneath.  If you just erase the white pixels, the semi-transparent pixels will leave artifacts around the image:

The above image is on a black background to highlight.  Note the white artifacts around the edge of the circle.

To truly restore transparency and get rid of the artifacts, we need two images, one on a white background, and another on a black background.  Then we can compare the images and average out the differences between the semi-transparent areas, thereby eliminating the artifacts.  For flash shapes, it’s relatively easy to generate a container movie that displays the shape on a black background.  You can do it with the “swfc” utility provided with swftools, and a script like this:

.flash filename="blackbg.swf" bbox=autocrop
   .swf temp "shape.swf"
   .put foo=temp
.end

Load the two images into GIMP using the “Open as Layers” dialog from the File menu.  Then duplicate each layer so that you have two copies of each image.  Order the layers so that the 2 layers with black backgrounds are on top of the white layers:
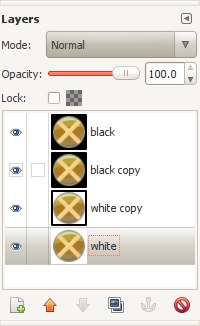
For clarity, I’ve renamed the layers according to their background colors.  Next, you want to hide “black” and “white” and select “black copy”.  Then set the opacity of “black copy” to 50.  The resulting image should be on a gray background, representing the average between black and white:

Now, merge the visible layers together (right-click on “black copy” and select “merge down”) to create a single layer containing the averaged background.  Move this layer to the top:
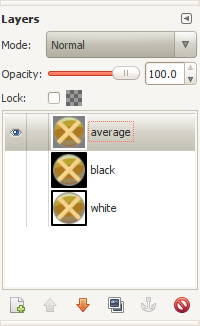
Now, we want to find the differences between the black and white layers and use this to create a layer mask, which we’ll paste over the averaged layer.  Hide “average” and show “black” and “white”.  Select “black”, click on the “Mode” drop-down box, and select “Difference.”  The result should look something like this:
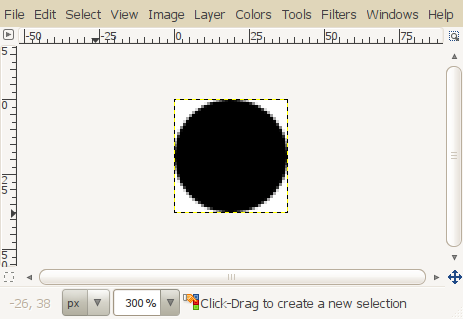
The amount of white corresponds to how much the two images differ.  The gray areas correspond to the anti-aliased pixels along the edge of the circle.

Now we’ll use this image to apply transparency to the top, averaged layer.  Press Ctrl-A to select the image, then Edit – Copy Visible (or Shift-Ctrl-C).  It’s important to “Copy Visible” and not just “Copy”, so we get the visual representation of the differences between the two layers.  Otherwise it’ll only copy the active layer.

Hide the two bottom layers, so only the top “average” layer is visible.  On the Layers dialog, right-click the top layer and select “Add Layer Mask.”  Select the first option to initialize the mask to white (full opacity), and click “Add.”

Make sure the top layer is selected.  Right-click on it in the layers dialog again and ensure that “Edit Layer Mask” is checked.  Then, paste the clipboard into the layer mask with Ctrl-V or Edit – Paste.  Finally, invert the layer mask with Colors – Invert.

Here’s the result, shown on a red background to illustrate that the artifacts are gone.
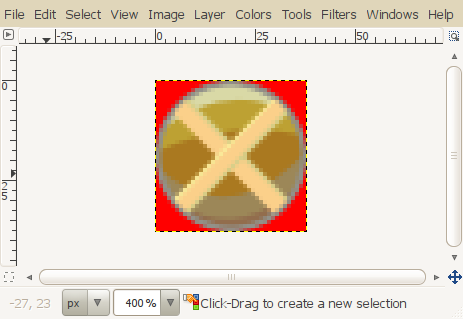
And there you have it.  Hopefully someone will find this useful!

Update…  I found myself having to do this with a very large number of images.  After spending a couple mind-numbing hours doing repetitive operations with GIMP, I figured out a way to script this using ImageMagick:

# produce averaged image
convert black.png -channel a -evaluate set 50% out$$.png
convert white.png out$$.png -flatten avg$$.png
rm out$$.png

# generate alpha mask
composite -compose difference white.png black.png out$$.png
convert -negate out$$.png mask$$.png
rm out$$.png

# apply mask to averaged image
composite mask$$.png -alpha off -compose Copy_Opacity avg$$.png output.png
rm mask$$.png avg$$.png

This works great, and looks to be a huge time saver.

Happy New Year

Well it’s 2012, and I’m back to work, and by extension, riding to work.  My 2-week holiday break was great, and much needed, but it seems that the older I get, the less my body likes changes to its routine.  I don’t miss work much for its own sake, but I miss the day-in, day-out routine of riding to work every morning, riding home every evening, and eating regular amounts of food at regular times.

I managed to sneak in one ride during the holidaze this year.  I did a quick 24-mile ride out to BWI, around the airport, and back.  That’s one of my go-to routes when I have 1½ hours to spare.

January has started out on a wintry note, with this morning’s ride in the 20s, with wind and flurries, and tomorrow morning looking similar.  But it looks like another warming trend is on the way for the end of the week.  This winter has been amazingly warm so far, warmer than any I can remember.  It’s been so warm that I wonder if we’re going to get any snow or ice at all.  I trotted out the studded tires this morning due to the snow threat, but they have yet to be broken in on “real” ice in spite of being on my bike since mid November.  I guess we’ll see what the next two months have in store.