Replaced the outlet at the foot of Andrew’s bed this morning, and it confirms the wiring layout:
- Master bedroom ceiling fixture
- Master bedroom switch box
- Andrew’s room, outlet at foot of bed
- Master bedroom, outlet behind bed
- Back basement, ceiling fixture
This is everything I need to know to come up with a plan to redo the wiring. It will be very similar to what I did in Michael’s room:
- Disconnect the old wiring between #1 and #2, and replace with a single run of 14/3 which will function as a switch loop.
- Disconnect the old wiring between #3 and #4.
- Run a new wire from the ceiling box (#1) to the basement.
- Mount a new junction box in the basement and splice the new wire into the existing wire between #4 and #5.
An alternative would be to run the new wire directly from #1 to #5, but #5 already has a lot of wires going into it, and I think mounting a new junction box would keep things neater.
The basic idea is to splice the ceiling fixture to the closest fixture downstream of the switch box with accessible wiring, then back-feed the two outlets immediately downstream of the switch.
Anyways, I now know enough about the circuit layout to put it in the wiki.
Incidentally, the old outlet in Andrew’s room was cracked almost in half. Check it out:
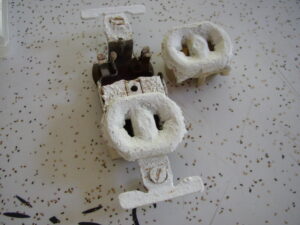
The outlet was most likely original to the house, and it was plastic, not porcelain. So apparently they were using plastic outlets back then, but not thermoplastic-coated wire.